There’s no reason to stand at long waits in lines, spend the price of tickets popcorn, or be in a noisy theatre for a movie of high quality, with DVD players that you can watch your favorite films without costly issues or distractions. In a matter of minutes, it is possible to take the DVD player from the box and connect it to your TV and relax to watch an episode. Follow the steps below to learn how to connect the DVD player to your TV.
The ability to connect the disc player straight to your television lets you enjoy watching TV shows that have been compiled or films. You can also enjoy as long as you would like instead of shorter programs or movies that show on TVs at fixed times.
How to connect a DVD Player to an intelligent TV Using HDMI Cable

It’s the most popular option since it’s most efficient and easy to use. Intelligent TVs made today include the HDMI Port for connecting older devices such as DVD Players.
How do I Connect?

Attach one end of an HDMI cable to the DVD Player and Smart TV.
Turn off to turn on the DVD player.
Choose the “Input Channel for the Smart TV using the ‘Smart TV’s Remote,’ not the DVD player’s.’.
A ‘DVD Player ‘ logo on your Smart TV ‘ screen.’
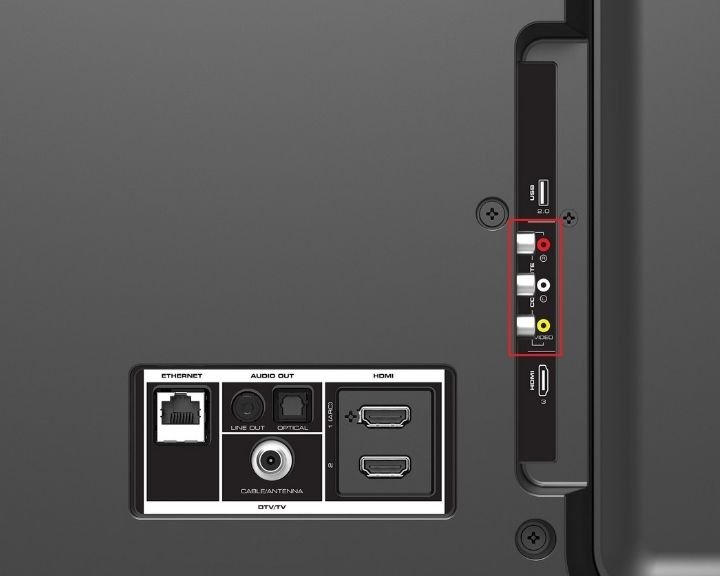
Verify if your Smart TV is equipped with a Component or Composite Video Input
The majority of smart TVs up to 65″ have an integrated video connector. If this is the case at the rear of the TV, you’ll be able to see an orange RCA connector that’s an analog-type video input. Also, it has an input stereo signal for the audio signal, with both red and white RCA connectors. Sometimes, you can use the stereo 3.5mm audio connector called a jack instead of the RCA connectors for audio connection. The picture below is intended to be a guideline.

If your TV is equipped with composite video, you can follow these instructions to join your DVD player to your TV:
Attach the video composite cable (Yellow RCA) to the DVD player.
Then follow, Connect next, connect the White or RED audio RCA cables to the appropriate connectors on the back of the DVD player.
- Connect the other end of the cable and audio cable and plug them into your television.
- Switch on the DVD player and then select the input channel of the TV.
- The logo of the DVD player is displayed on the TV’s screen.
In some instances, TVs come with Component video input. This is the analog signal for a video split into three distinct movements. Each sign is transmitted through a particular RCA cable: one blue, one green, and one red.
This type of connection provides better signal quality than composite. Audio is an independent signal, and it’s typically a red and white RCA or a smaller 3.5mm audio jack connector. See the picture below as your guide.

If your TV is equipped with component video, you can follow these instructions to link your DVD player to the TV.
The component video cables (Green Blue, Red, the RCA) with the player DVD.
Next, connect both the White and the RED audio RCA cables to the appropriate connectors on the back of the DVD player.
The other end of the video component cable and audio cable and plug them into the TV.
Switch on the DVD player and then select the input channel of the TV.
At this moment, you’ll be able to see the logo of the DVD player on the TV’s screen.
Be aware that if you have to purchase an audio or video component cable, be sure to buy an RCA to RCA audio cable since you’ll need it to deliver audio signals to the television.
Can I play my old Video Game Consoles with My Smart TV?
You may also have an older video gaming console inside those boxes, in which you put that old VCR.
If you’re in the mood for another nostalgic trip, then plug in the old console if the Smart TV has the necessary ports.
It could lead to unpleasant results because the video resolutions are not designed to support HD viewing. For example, Sega Genesis and the Nintendo Entertainment System (NES), and The Sega Genesis were designed with a resolution of 240p.
If you’re looking to play, make sure you know which options you have for connecting to your output video. If an antenna input is a sole option, you’ll require to switch on the radio. Also, don’t configure the Smart TV to search for channels automatically.
It is also important to note you need to know that the Light Gun accessory made by Nintendo for the NES cannot be used on Smart TVs as it requires a Cathode Ray Tube for it to function.
For consoles that launched sometime later and have components video ports instead of the RF connectors, think about buying a converter to HDMI to make the game’s display larger to HD.
Don’t forget to change into a game mode when you turn on your television if you intend to play older console games. Like modern gaming systems, older consoles will benefit from more responsiveness in game mode.
What to do if there Are Issues with Connection
Sometimes, the connections may not work after following the proper steps. Specific corrective actions can guarantee the correct operation and operation of devices.
Make use of a different cable. Sometimes, the old cords and cables may wear out, and the plugs may become disconnected. This could result in an unsteady connection. Try a different line to resolve the issue.
Check that the cables are connected to the correct ports. For instance, the red connector can be plugged into the red port on the DVD player or TV.
Make sure that the output and input ends are secure. If you’re only receiving audio signals, examine your video connection.
Many DVDs include instructions for installation, and it gives the user an easier way to navigate the working and operation of the player. It is recommended to experiment with the new cables and cords before purchasing them if the business allows this. You can also buy it from a retailer like Amazon with a reasonable return policy if they do not perform as expected.