
In contrast to picking the best face scrub, knowing how to apply dermaplaning at home requires more work. This popular method of facial exfoliation offers advantages of your preferred chemical or physical exfoliant, including glowing, smooth, and evenly toned skin. This tool is quickly becoming the makeup artist and celebrity preferred for events on the red carpet. Some Glamour editors even compared the effects of filtering IRL to “dolphin skin.”
“It’s exfoliating at its best,” dermatologist Mona Gohara, M.D., about the process. Gohara recommends it to people who wish to diminish the appearance of lines and pores, improve the skin tone and provide the perfect primed skin for makeup. For those just beginning dermaplaning, The highly-hyped results are with disadvantages. To ensure you’re getting the skin you’ve always wanted in your dream without causing discomfort, read on to learn everything you should know when dermaplaning is the pros.
What is Dermaplaning?
Dermaplaning is a skin treatment that uses a small exfoliating scalpel to eliminate the skin’s top layer and pores, where you will find dirt and oil, dead skin cells, and peach fudge. “Most people are derma planning candidates,” notes Kunin. “If you have sensitive skin, acne, active eczema, or other rashes, dermaplaning is not advised.” However, it is an efficient method to remove facial hair and exfoliate. Think of it as a more buzzy phrase to trim your facial hair. It is possible to do it at a beauty salon by the esthetician or in your home. “Dermaplaning is similar to shaving. However, the tool is better suited to exfoliate the epidermis than a razor,” Kunin says. Kunin.
Five potential advantages of dermaplaning
Exfoliation. Dermaplaning is a great way to remove some of the dead skin cells from your face.
A more smooth skin. Dermal planning could result in your skin appearing and feeling softer.
Hair removal. Many people love how their skin appears and feels without facial hair. It’s not that you should remove the hair–it’s entirely a choice of your own We’re with you regardless!
Make scars less visible. The procedure, mainly when done by a specialist, can be used to eliminate superficial layers of skin. It can also help to reduce the appearance of scarring.1
Easier makeup application. Dermaplaning could give your skin a smoother feel and make applying makeup seem effortless. Imagine painting on a sheet of paper with painting concrete.
Dermaplaning at Home: A 3-Step Guide

So, I’m sure you’re asking, “Ok, how do I do it?”
You’re in luck because I’ve prepared a step-by-step tutorial for dermaplaning yourself from your home.
Because you’re basically cutting the outer layer of dead skin on the face, it will be much more visible than usual.
Step 1: Choose your dermaplaning tool.
The most obvious first step is finding the right tool. There are many options available there (referenced in the next section); however, I prefer Tinkle’s inexpensive and disposable versions made by Tinkle.
The Tinkle is considered the most secret for dermaplaning enthusiasts, And at less than $5 for three blades, it’s a good deal. It is possible to use multiple times from each shaver, and, based on the frequency you select for shaving, a 3-pack is likely to last a few months.
Step 2: Prep your skin.
Then, ensure that you have prepared your face. Keeping your face clean, dry, and bare (not only washed) is essential to get the best results. It will allow you to gently scrape your face to exfoliate your skin while eliminating all that nasty things.
Before you begin your process, you must apply a toner. This will help smooth your skin and help hydrate the skin beneath. Be sure to ensure that your toner is dry before beginning the process of dermaplaning.
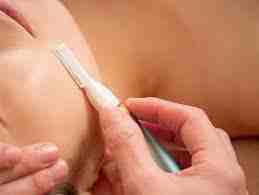
Step 3: Secure your skin taut and cut at a 45-degree angle.
Once you’ve cleaned your face and are ready to apply the treatment, start with one side of your face and then shave it upwards at a 45-degree angle. Keep your face tucked by securing it with two fingers (on the same hand) as you grip the instrument in the opposite hand and perform the stroke.
It is recommended to keep the motion around your face, at the very least, in areas you believe need it. The thing to remember is that certain regions will require the treatment more so than other areas or are not in need even at all. Each person’s skin type is unique. In my case, for instance, I don’t cut my forehead. Instead, I use the derma plane to smooth the cheeks, chin, lower and upper lips, and neck.
The entire process should last at least 5 minutes. This is a simple, straightforward process that’s nearly impossible to cut yourself. The hairs you’re aiming at are not enough to cause an outbreak or force the shave to be so intense that it could cause you to cut yourself.
DERMAPLANING BEFORE AND AFTER TIPS
The procedure of Dermaplaning will keep your skin looking smooth, bouncy, and soft; baby’s skin?
- Like any cosmetic treatment or diet plan, there are specific ways to make the most of your dermaplane experience.
- If you’re derma planning, apply your index and thumb to pull one inch or so of your skin tight. The skin will stay snug and avoid injuries caused by a cut.
- To ensure sterility, it is recommended to discard the blade at the end of each usage, but you can continue using it until it becomes dull.
- Following treatment, you should avoid any exercise that causes you to sweat.
- Do not come into direct contact with the sun for 48-72 hours over the surface.
- Make sure to apply the cosmetics as soon as possible after the use
- Wear sunscreen daily. However, this should be a matter of the way you do it, in case it’s the most practical everyday anti-aging weapon to have in your bag. Choose one that has at minimum fifteen or more protection. Apply it as often as you need to throughout the day or before any prolonged exposure to UVB or UVA.
- Be sure to apply an easy cleanser for your skin every day.
Is derma planning excellent or bad for the skin?
Dermaplaning benefits are extensively reported and can range from a smoother and more radiant appearance to a more even skin tone and improved skin cell renewal (we’ve provided additional advantages below). This is one of the treatments suitable for all skin kinds, except those with very fragile skin, thick facial hair, or other skin problems like acne or Rosacea, which could get worse and spread because of abrasion or dermaplaning.
Concerning the negatives of the procedure, they are not many apart from the fact that your skin could appear bloodshot right away. You should also avoid applying makeup throughout the day since the skin barrier is exposed and more susceptible to irritation.
The Best At-Home Dermaplaning Tools
There are many choices in the marketplace today. However, I always have a set of Schick Hydro Silk Touch-Up Exfoliating Dermaplaning Tools in the bathroom cabinets. Three packs cost just $7 on Amazon. Most of the time, I buy an additional set instead of washing them following use. This is to ensure there are no remaining active bacteria.

A different Southern Living editor, Betsy Cribb, loves Tinkle Eyebrow Razors. and they are priced reasonably at $6 for a set of 6 razors for maintaining, particularly in the area of the brows that individuals naturally tend to have more wild hairs or peach fuzz.
More expensive equipment is also available to provide the luxury of a spa. Also, when you’re looking for the highest quality and secure result, make sure you consult an expert!
Summary
It can result in flawless and glowing skin. It also helps even your skin without needing to depend on exfoliants with uncomfortable chemicals.
If the procedure isn’t done correctly, this could lead to damage to the skin.
This is a cosmetic treatment appropriate for all skin types.