In Windows 11, I usually must enable”Remote Desktop” “Remote Desktop” option to make use of this feature. RDP (Remote Desktop Protocol) to connect to computers on the network and provide help while not physically on the premises with the new “Remote Desktop” or older “Remote Desktop Connection” application.
If you have to connect an external device, Windows 11 includes multiple options to set up this feature by using the Settings application and Control Panel and Command Prompt as well as PowerShell commands.
In this tutorial I’ll teach you how to turn on the option to manage remotely different computers running Windows 11.
How to Enable Remote Desktop on Windows 11?
There are a variety of methods to activate Remote Desktop on your Windows 11 PC. I’ve discussed all of them in this article. Read all of them individually, and then choose the most effective for you. Each of the strategies listed below works equally well for enabling Remote Desktop. Remote Desktop feature on Windows 11.
Enable Remote Desktop on Windows 11 via Windows Settings
The easiest way to activate Remote Desktop on Windows 11 is to do so via Windows settings. The steps below must be followed and in the correct sequence to accomplish this job without a glitch:
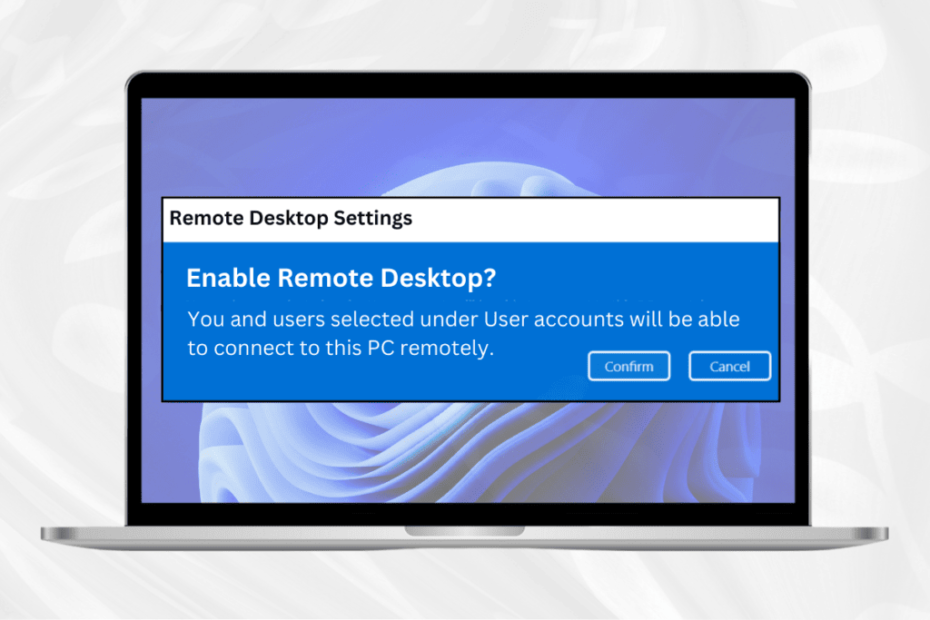
- Simply click on the Start icon in the Windows taskbar. Select “Settings” from the Start menu.

- On the Settings page, click the System option on the left pane. Then, select the Remote Desktop option at the bottom of the page.

- On the Remote Desktop, click to turn off the “Off” button.

- Press the “Confirm” button to activate remote desktop capabilities.

- Once this feature has been enabled You will see the words “On” next to it. Remote Desktop option.

It’s done, the Remote Desktop feature has been successfully activated on Windows 11 and your computer can now connect remotely to other devices. But you should set it up to enable the Remote Desktop feature before using it. In particular, it is recommended to make use of the Network Level Authentication option to ensure that the remote connection can be made safer. If you configure the remote connection options through the router, you might get asked to enter the current Remote Desktop port when you go to the page for settings, but most times the port number will be 3389.
Enable Remote Desktop on Windows 11 via Control Panel
There is a way to activate Remote Desktop. You can also enable the Remote Desktop feature on Windows 11 by using Control Panel. This way you will have a number of other options to choose. Follow the instructions below thoroughly before beginning the process:
- Press the ‘Start’ button. In the Windows search box, type in ‘control” and click the Control Panel from the results of your search.
- Within the Control Panel window select the ‘System and Security’ option.
- In the section System Select ‘Allow remote access’ hyperlink.
- On the System Properties, select the remote tab. Next, under the Remote Desktop section, click on the ‘Allow remote connections on the PC’ button and ensure that only the ‘Allow connections to computer running Remote Desktop with Network Level authentication’ setting is turned on. After that, select the “Apply”, then click the “OK for finalizing your modifications.
- After you’ve done the above steps If you have completed the above-mentioned steps, then the Windows 11 computer is ready to allow remote connection to other devices. You’ve read that with this approach, you have the choice to turn on or deactivate the Network Level Authentication. Make sure you enable it since it can make remote connections safer.
Enable Remote Desktop on Windows 11 via Command Prompt
It is possible to use the Command Prompt on Windows 11 to turn on the Remote Desktop feature. Follow the instructions below exactly as the steps have been described:
- Select the Start button. Then, in the search box, type in “terminal”, and from the search results, find and click right on “Windows Terminal Preview” or the Command Prompt choice, they are both the identical. Select the “Run as Administrator” option in the menu.
- Within the User Account Control box, press the “Yes” button in order to launch Windows Terminal Preview. Windows Terminal Preview.
- Within the Command Prompt window, type or copy-paste this command ‘netsh: advfirewall firewall set rules group=”remote desktop” New enable=Yes’ and then hit the Enter key to activate Remote Desktop. Remote Desktop via Windows Firewall.
- If you’ve followed the above steps correctly If you have followed the steps correctly, then Remote Desktop feature has been activated in Windows 11 or Windows 11 and the Windows Firewall is configured to permit remote access to your PC.
Allow Remote Desktop via PowerShell
To activate this feature, called the Remote Desktop feature with PowerShell commands for Windows 11, use these steps:
- Open Start.
- Find PowerShell,, right-click on the first page, and and select the Run as Administrator option.
- Use the command below to turn on the remote desktop protocol, then hit Enter.
Set-ItemProperty -Path ‘HKLM:\System\CurrentControlSet\Control\Terminal Server’ -name “fDenyTSConnections” -value 0
(Optional) Enter the following command to activate the remote desktop feature via Windows Firewall. Type the following command to turn on remote desktop feature through Windows Firewall and press Enter:
Enable-Net Firewall Rule -Display Group “Remote Desktop”
Following the procedure following the steps, you’ll be able to access after completing the steps, you can use Remote Desktop app on Windows 11 to connect to the Device remotely even if firewalls are enabled.
Remote Desktop alternatives for Windows Home [safe & free remote Desktop alternative for Windows Home [safe and free
These steps may be acceptable for the majority of Windows Home users, many individuals are concerned regarding the security implications of implementing private features that are not official. For this reason we recommend using an alternative from a third party Remote desktop alternative.
Many remote desktop programs are available for Windows, including W,sincludingditions. You can take the renowned remote access program AnyViewer as an example. With it, you can access any PC remotely via the same system or the Internet. Most important, AnyViewer lowers the dangers with enabling RDP within Windows Home using a workaround. It’s susceptible to all security risks, particularly when you connect remotely via the Internet.
Step 1. In the host’s PC visit the Log In screen, then select Join Now. Fill in the information below to establish the AnyViewer account.
Step 2. The client’s PC start AnyViewer and then sign into the account. Your Device is added to the account immediately after successfully logging in.
Step 3. Click on Device Choose the desired PC and then click the on the One-click button to enable remote access.
Last wordings
To conclude, even though Windows 10/11 Home editions have restrictions with RDP but effective solutions as well as alternatives such as HelpWire are available. They provide remote desktop capabilities, which cater to different preferences in terms of security and user-friendliness. If you choose to use the RDP wrapping library and wrapper or HelpWire you will be able to keep efficiency and accessibility with remote access to your Windows Home PC.