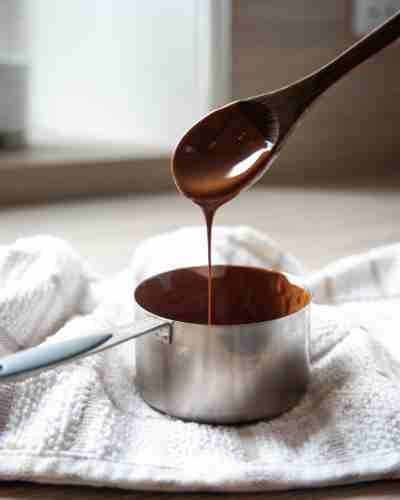
Melting Chocolate is a procedure that may seem simple. However, it can go wrong in various ways and could go wrong very quickly. One way it could be a disaster is when it melts but is not thick enough for baking.
Several factors could cause this. The Chocolate you bought might not be ideal for melting (some are better to eat right from the packaging), or it could be cooked too long.
Please don’t fret; there are some ways you can thin out the melted Chocolate so that you don’t need to throw it away and begin over.
3 Tips for Melting Chocolate
The process of melting Chocolate can be more complicated than simply microwaving the container of Chocolate. The proper melting process requires you to temper the Chocolate to ensure it is smooth and robust for your recipes. Here’s how you melt Chocolate:
- Be careful not to over-melt the Chocolate. The thicker the Chocolate, the hotter it is. It is best to melt the Chocolate slowly under low heat so it doesn’t become too hot and remains thin. With a microwave-safe bowl, the Chocolate is melted in ten-second increments and then removed when only a few small lumps remain. The heat from the remaining heat will melt the remainder of the nodes while it stirs the Chocolate.
- The Chocolate should be melted in the glass bowl. Glass can hold heat, which helps keep the Chocolate melted for longer. Additionally, Glass allows you to recognize when Chocolate is beginning to melt. But, if the Chocolate is overheated and becomes too hot, it will take a long time to cool in the glass bowl.
- Utilize the double boiler method. Double boilers are bowls placed in an oven above a small amount of boiling or simmering water. This is an excellent method to melt Chocolate since it’s a slow process that has a low chance that the Chocolate will overheat. Be careful not to dampen the Chocolate as it can alter its characteristics of the Chocolate.
How do I Make Melted Chocolate Thinner?

There are various choices to achieve the ideal texture of the Chocolate, which is to make it thin enough to be used in other ways.
After the Chocolate has melted, you can begin to dip it. But there are a few things to know before starting to melt.
This means that you have to create a texture perfect and thin enough that it’s perfect. If you need to know if you have the right consistency, adhere to the following tips.
Warm it up
The first idea that pops into your mind is to place it on the stove again and heat it again. It is essential to take this up sparingly.
If you make it more than once , the Chocolate might get burned and leave an uncooked flavor you wish to avoid having on your cake or using as a dip. To avoid this, you can use a small amount of oil, then heat it.
Add Fat
Another beneficial option is adding fat into the mix. If you’ve ever melted Chocolate before and have experienced a negative experience, we highly recommend including fats, such as butter or oil, to the mixture. Please don’t overdo it to create a smooth texture.
This will help keep the Chocolate moist and not become dry or thick. Make sure to stir until your Chocolate becomes smooth. Use 1 tablespoon of vegetable oil for each teaspoon of Chocolate.
Include paramount crystals
Another method to make the chocolaty thin is to use the paramount crystals. They’re also composed of vegetable oils, typically operated by bakers with professional experience.
They’re practical and straightforward to make use of. You’ll need one teaspoon of the paramount crystals for each cup of Chocolate. So you can achieve the perfect melting chocolate.
Mix Warm Milk
Milk isn’t a type of fat like oil or butter, but it does contain a significant fat amount. Like the fat, it is a good idea to add a small amount of Chocolate and then stir it. If you require more, add a bit and continue stirring until you achieve the desired consistency.
Any milk type will work, but whole milk has the most beneficial effect because it is the fattest amount.
Similar to dairy chocolate, it is made up of (no surprising) milk. Therefore, it works best with Chocolate that has been melted.

A key thing to remember is to avoid adding anything cold to Chocolate, particularly liquid stuff like milk. Adding cold items to something warm or hot could cause it to form a curdle and separate. This can render the Chocolate unusable.
If you want something extra rich, include cream in the Chocolate. However, just like the milk, ensure it’s warm, cautious, and slow.
How to Avoid the Thick Chocolate
If you’ve learned how to fix Chocolate that’s too thick and hard to cut, here are some guidelines to ensure that it doesn’t happen in the first place.
Slowly melt it and observe.
It’s tempting to break up a chocolate bar and place it in a dish in the microwave oven. This is a quick method of melting Chocolate. However, it’s also an easy method to cause it to be burned.
The best method for melting Chocolate is to do it on the stove using the bain-marie. To accomplish this, heat a pan of water to the boiling point and then reduce it to moderate heat. In the water, set the heat-proof bowl and include the broken Chocolate in the bowl.
The method of melting Chocolate can stop melting it. The addition of Chocolate directly into the pan can cause it to heat too fast and can cause it to melt.
Slow and steady
Chocolate may become thicker when it’s overheated. Avoid rushing or melting the Chocolate too fast because it could overheat and ignite.
It is best to simmer the Chocolate at moderate heat. The heat that is too fast can cause the Chocolate to be too hot and dense than the consistency you’re looking for.
If you crank the heat to a level too high for a bath-Marie, the water could cause a mess.
Select the Best Chocolate
The most suitable Chocolate for baking is one with a higher cocoa content. Approximately 70%-80 percent is acceptable.
As you may have guessed from the remainder of this post, Chocolate with high-fat content is also excellent to melt. Anything that is around 30 percent fat is a perfect choice.
If you’re looking to temper the Chocolate you purchase, you can try and find something that uses the name “couverture.” Couverture chocolate is specifically made for tempering and makes tempering much simpler.
The process of melting Chocolate may seem daunting initially, but, like all things, it gets easier as you get better at it. Just make sure you are patient and use the highest ingredients you can get.
How long does it take Chocolate to set?
The time it takes Chocolate to solidify is contingent upon many factors, including thickness, its type, and the environment in which it is placed.
If you wish to firm Chocolate in small molds, it should take 20-30 minutes at room temperature. If you’re trying to get a quicker outcome, solidifying in the refrigerator takes 10-15 minutes. Storing your frozen food in the freezer will cut the time needed to harden to 5 to 10 minutes.